
As you can probably tell, I decided not to do a test-paint of the sci-fi buildings after finishing the WW2 Japanese batch. I photographed those and submitted the post on Thursday, then looked at what else was coming up in the queue and decided to shift to WW2 British Airborne.
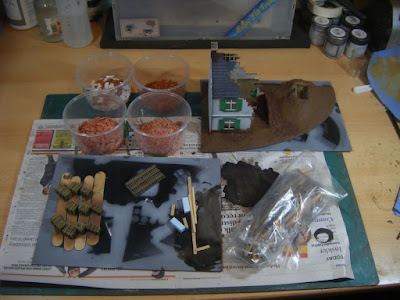
A while ago I bought the HQ group from Artizan along with a pack of seated paras. I decided to make up a diorama base to show them off. I got the building mostly painted on Thursday, then did some initial weathering yesterday. I also sorted out a terrain base for it to go on and thought that it might be fun to add dugout in a small bank nearby - I cut that from some blue XPS foam. I then spent a while cutting up coffee stirrers to make "planks" to line the inside.


I also started on a roof for the dugout using some longer "planks" and some of the corrugated card "wrinkly tin" pieces I'd cut out when I was doing the jungle buildings last year. I also thought it might be handy to have some crates scattered around, so I dragged out the pack I bought from Debris of War at Salute. Those got primed today, before a wash with Agrax Earthshade followed by drybrushing.


Nice work Tamsin
ReplyDeleteCheers! :)
DeleteAh Das Pronto, many things have I made with that stuff!
ReplyDeleteI am looking forward to seeing your 'Red Berets'!
It's one of those fun products to use for things! :)
DeleteAs for the maroon mafia, you'll need to wait a week to see them! :)
Great progress on the diorama Tamsin
ReplyDeleteThanks! :)
DeleteMaking bricks. That's real dedication right there!
ReplyDeleteIt is indeed, and incredibly boring! :)
DeleteI would never have thought of making bricks the traditional way! That's very clever.
ReplyDeleteI didn't know they traditionally made bricks using a texture roller! lol
DeleteThe method does work, but it's quite a bit of boring effort.