About Me

My photo
London, United Kingdom, United Kingdom
A mythical beast - a female wargamer! I got back into wargaming in the summer of 2011 after a very, very long break and haven't looked back since. I must admit that I seem to be more of a painter/collector than a gamer, but do hope to correct that at some point in the near future. My gaming interests span the ages, from the "Biblical" era all the way through to the far future. I enjoy games of all sizes, from a handful of figures up to major battles (see my megalomaniacally sized Choson Korean and Russian Seven Years War armies).

Tuesday 20 December 2022

Eve Of Challenge Post


Yes, folks - tomorrow is the start of AHPC XIII. I am once again participating as a, errr, participant and also doing minion duties. For those of you who follow the Challenge, I am not going to be the Senior Flight Attendant this year. Instead I will be the Senior Studio Tour Guide, to fit in with the theme of this year's Bonus map.

As you can see from the photo above I have my painting desk set up and ready to go in the morning. I haven't decided yet what figures will hit the table first - I have a few choices. Whatever I decide on, it will have to be something quick so that (if possible) I can get a post submitted on Day One. The next one will also need to be a quick job as I will be heading off to Sussex on Friday morning and don't want to leave figures partially painted.


Before setting the painting desk up, I took some photos of what I've primed and 3D printed since my last post:


Primed Stuff

That's the three Judge Dredd busts I printed a while ago, the Kleggs (replacements for the missing parts were received a couple of weeks ago) and some 3D printed figures from 2nd Dynasty. For the last set, I decided to try printing the pre-supported models intended for resin printers - they looked OK-ish, but once primed I realised how bad the layer lines are on them:


As there is no way of overcoming that with painting, I'm going to scrap those. Having seen them primed, I also printed one figure without the pre-supports but using the ones from the slicer software. I haven't primed it yet. I suspect that I will end up having to find someone with a resin printer to print them for me to get a decent quality for painting.

I'm still printing out Traveller cargo containers:

Sealed

Controlled Environment

Standard

I've got all the Sealed and Controlled Environment containers I'll ever want; I need a few more to fill that board of Standard containers. And then I'll want to fill one or two more boards of Standard containers! When these are done (sometime tomorrow) I will have on each board: 6 x 2 Ton, 6 x 4 Ton and 2 x 6 Ton containers. Any extra containers I print will be the 4 Ton ones.

I also decided to try re-scaling some of the small "crate" size items to container size:

Quad Gas Cylinders, 1 Ton

Gas Can, 4 Ton

Yesterday, I was coming to the end of a spool of filament. there wasn't enough left to do any containers, so I thought I'd print another grave bike. Each bike takes 3 prints (the bike, the windshield and the stand). I'd printed one stand and underestimated how much filament was remaining - I didn't think there was enough to do the rest of one bike, but enough to print another stand. When that was done, I had enough left to print a third stand - if I'd estimated better I would have had enough to print one complete grav bike.  However, with two complete bikes already printed (one I have posted, one I haven't) I decided to print two windshields. There was still a bit of filament left so I did a quick print of something else, changed spools and then printed two bikes. Here are the three bikes you haven't seen before:


Over the next three months, I will mostly be blogging twice a week - you'll get my Wednesday Workbench posts and on Saturday's there will either be a post of my submissions for that week (my assigned posting day is Friday) or a progress update.

Saturday 10 December 2022

Paint Table Saturday 10 December 2022


And...I'm back. I haven't had anything to post, apart from 3D prints. I still don't really, but thought that I ought to post something anyway.

At the moment I'm getting myself sorted for the Analogue Hobbies Painting Challenge which begins in just over a week. That has meant getting the various bits together for my main project. Then deciding that I need to reprint some of them. There are a couple of parts that I'm having a big problem with; hopefully I'll finally get them right this week.

I ordered some more primers and paints and they arrived a few days ago:


That should be enough to see me through the Type S Scout Courier.


3D Printing

I've carried on with printing Traveller cargo containers, in between printing other things.

Standard Containers:


Sealed Containers:


Controlled Environment Containers:


I've also printed some alternative partitions and bulkheads for the Type S Scout Courier with the doors fused in place - they should be easier for painting.


The Beowulf Kickstarter campaign I backed has released the ship files and also most of the stretch goals - not bad when you consider that it's less than a month since the end of the campaign. I've been printing some of the smaller items.


Grav Bike, Emergency Low Berths & Air Raft Van 


Rampart Light Fighter


I've shown it on the stand but I've also printed landing gear in case I decide to put it in a hangar diorama.


Well, that's all for now folks!

Wednesday 30 November 2022

Wednesday Workbench 30 November 2022


I've been doing a few things since Saturday, mostly slicing files for 3D printing and then printing them. As you can see, I'm also in the middle of deep-cleaning one of my airbrushes.


You may recall that I'd primed a piece "grey" and then hand-brushed a dark grey into the panel lines. I've airbrushed two different colours onto that piece to see how it looks:


It looks OK under the pale blue, but is far too dark under the yellow - I think that for lighter top colours I might need to use a lighter grey for the panel lining. I might also use the airbrush to add a diffuse line of a lighter grey around the panel lines so that the edges of panels are slightly darker than the centres. I'll need to test that in the next few days.

I also tested a couple of colours on the internal partition pieces:


I think I prefer the pale blue grey (top).


3D Printing


I've mostly been printing cargo. I printed another of the shipping containers that you've seen before. I then sliced a load of "Traveller" crates and shipping containers. I've been printing them for the last couple of days and have a few more days of printing to go.

1/4 Ton Crates

Liquid, gas cylinders, reinforced

Bolted, locked, plain

1/2 Ton Crates

Back - gas can, gas cylinders
Front - locked, bolted, plain

6 Ton Containers

Sealed, controlled environment


I've got another 6-ton container to print, then 2- and 4-ton versions. My plan is to eventually have more than enough to fill the 82-Ton hold of the Beowulf class Free Trader which will be next year's big printing project.

Saturday 26 November 2022

Paint Table Saturday 26 November 2022


Apologies for the lack of posts recently. I haven't really had anything worth posting about until now.

Over the past few days I've been testing out priming, pre-shading and paint schemes for when I paint up my Type S Scout Courier. 


The piece on the left was primed "grey" (more of an off-white, actually) and the panel lines were shaded using a dark grey with the airbrush; the piece on the right was primed black, then the panels were gone over with the "grey" primer avoiding the panel lines as far as possible. I think that darkening the panel lines over the "grey" primer works best, but might be better done by hand rather than airbrushed. I've primed another piece and done the panel lining by hand to test this out:


I primed a couple of other pieces that hadn't been sanded to test out different colours for the paint scheme:


This was just to see how different colours work together. The brighter colours will be for accents/details; I think I'll go with one of the yellows as the main colour.

I've also done a zenithal prime on a couple of interior pieces to test out colour schemes:


I went with a dark grey primer as the base rather than black as it should be less stark. It also shows up over the black plastic, which all the ship parts have been printed in.


3D Printing

I finally got around to printing the last of the 1:270 scale Traveller ships:


I had to reprint a few parts to replace ones which broker or didn't quite fit. I also had to switch filament spools as I didn't have enough of the black to do the top half. The little bags in front contain a radar dish and various antennae to add later on - I'll need to drill out the holes the antennae go in as they are too snug at the moment. All told, that took about four days to print.


As well as the ship I've printed some more shipping containers (you can never have enough after all) and some air raft variants - the original 2-seater, a 4-seater coupe, a 4-seater saloon and three pick-ups (2-seater, coupe and saloon).

I decided to take advantage of the Black Friday deals on Amazon to stock up on filament, so I've got plenty to keep me going.

Saturday 12 November 2022

Paint Table Saturday 12 November 2022


At the back of the photo above you can see what I'm currently working on:

These are two ship parts which I'd run off while testing print speeds. After mishaps while applying the first round of spray putty, I printed the parts they are sitting on.

Before the first coat of spray putty I did an initial sanding pass with the coarse and medium grit pad. I then did a second coarse & medium pass after the spray putty had dried, followed by re-scribing the panel lines. I think the initial spray putty coat was a bit too heavy - it took a lot of sanding and the panel lines were well and truly clogged. after washing the parts down to remove sanding dust and letting them dry completely I gave them a second, lighter spray putty coat which hasn't clogged the panel lines as much. I'll be sanding them with a medium & fine grit pad tomorrow.

I'll be using these to test different priming and pre-shading methods. One will be black primer, followed  by dry-brushing; the other will be light grey primer, heavy black wash, then dry-brushing.


3D Printing

After doing several more tests, I've finally worked out why I was getting such bad stringing. It was a result of the lower ambient temperature and/or higher humidity. I've been able to resolve it by placing the in-use spool in my filament dryer and running it directly from there to the printer:

There are only two potential issues with running it like this:

1. It's not possible with this dryer to see how much filament is left on the spool

2. Whilst it's being used for the in-use spool, you can't dry the next spool

Anyway, here are a couple of  "before and after" comparison prints:


With that issue finally solved, I've started printing the last of the 1:270 scale Traveller ships. I'd left it until last as it's huge and will take a few days to print. I suspect that I'll have to switch spools as I've used so much of the black trying to sort out the stringing. As I've got a few other bits that I want to print in black, I'll probably do those before  do the main body sections.

Wednesday 9 November 2022

Wednesday Workbench 09 November 2022


I've been doing some more experimentation. Along with the new hotend and fan for my 3D printer, I also ordered a can of spray putty - I've been told that it is better than filler primer and wanted to try it for myself. I used it on another scrap piece from my Type S. I applied one coat all over, then sanded it down. I was simultaneously testing the cheaper own-brand sanding pads from Wilko. For the first pass I used the coarse/medium pad. With that done, I applied another coat of spray putty to half of each face, then sanded it down with the medium/fine pad.

As with the filler primer, the main problem is that it does fill in the panel lines - I need to get better at cleaning those back out. It's particularly difficult with some of the less recessed details. It also has to be done after sanding as you can't see them clearly until then.

I will say this much - it does do a better job of filling in the layer lines than filler primer; each coat was about the equivalent of two coats of filler primer. It's also cheaper - I'll definitely be using it when I prep my Type S.


As for the painting afterwards, the priming went well as did the recess shading and drybrushing I did. I hit a problem when I went to airbrush the pale blue colour - the paint came out much faster than expected, so I ended up having to do several thin coats over the top to even it out and that obscured all the pre-shading/highlighting work I'd done. I decided to gloss varnish it and apply an oil wash for the panel lining (just the varnishing done so far).


3D Printing

I installed the new hotend and fan on Sunday and then had a bit of an issue - for some reason the auto-leveling probe wasn't working. I took back apart to check the wiring, put it back together - still not working. After asking for some advice, I re-flashed the firmware - still not working. I took it apart again, looked to see if anything was up with the wiring that I hadn't spotted the first time, didn't see (or touch) anything, put it back together and...it was working.

Reflashing the firmware meant that it was reset to factory defaults. I therefore needed to recalibrate it. Before doing that I ran a couple of test prints - it's just as well I did as I could tell from the surface quality that I'd knocked a few things off kilter while replacing the parts. After making adjustments and running test prints after each I got to a point where everything was good again.

The problem was I was still getting stringing. I ran more test pieces with different retraction settings, to no avail - I would need to increase the retraction distance and speed to a point where it would then cause under-extrusion when it started printing again. So I tried a different tack - printing at a lower temperature. Dropping from 210C to 190C seems to have done the trick. It was also a good excuse to print a couple of models I haven't printed before.

210C

200C

190C

Different dragon, 200C and 190C

I'm still not sure what is causing the stringing at 210C - I'd been printing at that temperature for months without issue. It wasn't the hotend (although changing it was worth doing as it was well and truly gunked up). I could probably have got away with just changing the heatbreak, but wasn't sure which one I needed to buy.

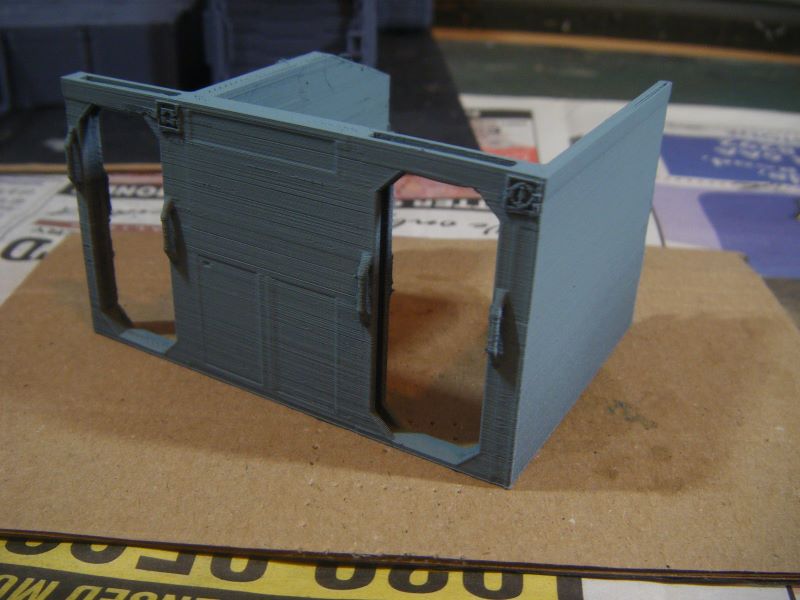
With that done, I decided to return to testing speed and acceleration values for my starship printing. I also wanted to see how parts like the cabin partitions would come out at 0.16mm layer height (I'd previously printed them at 0.12mm). I got the first two prints done today:

Left 250 mm/s/s; right 500 mm/s/s

One was printed at 250 mm/s/s, the other at 500 mm/s/s. Both printed the details OK, but I think for the higher acceleration (500 mm/s/s) I might need to increase the flow rate slightly as there was some under-extrusion at the start of some layers. I'll need to do another print at 250mm/s/s acceleration, this time at 190C to confirm that it's the acceleration rather than the temperature causing that under-extrusion.

Once I've got these test prints done, I think I'll print out the last 1:270 scale Traveller ship. After that, I'm not sure what will be next.