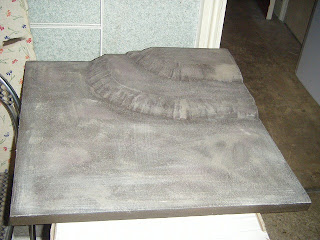
I know you've all been on tenterhooks, wondering just what it was that I was working on, so here you go - a terrain/display board for doing my miniatures photography on.
Hill sections shaped with a cheapo hot-wire cutter then glued into one corner. These were then sanded to provide a suitable surface for painting and to smooth off sharp edges on the hill sides.
Reeves Modeling Paste smeared to fill air bubbles and the joins between elevations.
Reeves Coarse Texture Gel with some brown ink added was then smeared over the whole board to add some grainy texture (and also to provide some extra hole/gap filling). Why add the ink? So that I could see where the gel had gone!
Basecoat of Galeria acrylic paint (Raw Umber)
Heavy dry-brush of B&Q Cocoa Bean matt emulsion paint
Medium dry-brush of Galleria raw umber with some B&Q cool grey matt emulsion mixed in
Light dry-brush of B&Q cool grey with a little Galleria raw umber mixed in.
I forgot to take a photo of the next step which was sticking on rocks and sand/gravel/ore mix in various places. Once the placement glue had dried, they received a sealing coat of Woodland Scenics scenic cement.
Next up, 50% PVA was brushed over the non-graveled areas, leaving some patches bare then flock (the Gold/Green mix I've used on the Sarmatian bases) was applied using a puffer bottle. After a few hours, the excess was shaken and brushed off onto paper and returned to the puffer bottle. The whole board then received a sealing coat of scenic cement. For some reason this took ages to dry fully.
Finally, patches were sprayed with scenic cement and "Meadow Grass" static grass was applied with a puffer bottle.
Not bad for a few days work, a few minutes a day. The photo above doesn't really do it justice. Now I've just got to think of where to store it and clear a space somewhere to make use of it!


That's very cool, is the secret project going on this?
ReplyDeleteLooking good, I always mean to build some scenery and stuff.
ReplyDeleteFantastic - it makes all the difference seeing minis on nice terrain!
ReplyDeleteFantastic hills!
ReplyDeleteWhere did you get your blue foam from?
Nice work, I am in the process of setting up a "man-cave" and I need to be thinking terrain boards :)
ReplyDeleteGood Post Thanks
Very, very nice!!!!!!
ReplyDeleteThanks guys!
ReplyDelete@ Fran - this was the secret project.
@ Dark Templar - from 4D Modelshop http://www.modelshop.co.uk/ You can get them elsewhere, http://www.panelsystems.co.uk/index.htm sell them by the box if you are after lots of them
That's a great idea! My photos have all been on Games Workshop grass mats (usually under horrid flourescent (sp)light) and it just doesn't look right to show off all those hours of painting. I'm looking forward to seeing your new photo board with figures on.
ReplyDeleteBrilliant terrain board! I wish we had Blue foam in South Africa :-(
ReplyDeleteGreat work Tamsin, should really enhance your photography; looking forward to seeing the results.
ReplyDeletethat's an impressive result Tamsin. This should be a good photo studio;)
ReplyDeleteGreat idea and excellent result Tamsin.
ReplyDeleteNever would have guessed and it looks great, we need a shot with figures on it
ReplyDeleteIan
I'll try to get some pics done with figures this evening for you. I'm still trying to decide whether or not to stick some trees along the "rear" edges - if I do, it will make it more difficult to store but will help to disguise the lack of depth. I guess I could make them removable and just put them into place as and when they are needed.
ReplyDeleteWell done, Tamsin. It should provide a fine backdrop for your future blog photo exposees.
ReplyDeletenice work - I look forward to future pics. Also wonder if this is something to consider for the future. It would beat setting up terrain for pics.
ReplyDeleteNice work Tasmin. Just out of interest did the board warp at all during the process?
ReplyDeleteCheers,
Steve