About Me

My photo
London, United Kingdom, United Kingdom
A mythical beast - a female wargamer! I got back into wargaming in the summer of 2011 after a very, very long break and haven't looked back since. I must admit that I seem to be more of a painter/collector than a gamer, but do hope to correct that at some point in the near future. My gaming interests span the ages, from the "Biblical" era all the way through to the far future. I enjoy games of all sizes, from a handful of figures up to major battles (see my megalomaniacally sized Choson Korean and Russian Seven Years War armies).

Monday 31 August 2015

Monday Update

Nothing finished today, but lots of bits and pieces at various stages of being done.


Playing with Pearls

Well, using that van box that I sprayed with silver, gold and copper yesterday. This morning I went over the metals with Brite Yellow; this afternoon I added Sunrise Yellow to the mix. It doesn't really show up very well, but here are pics anyway:


Dropped Spikes

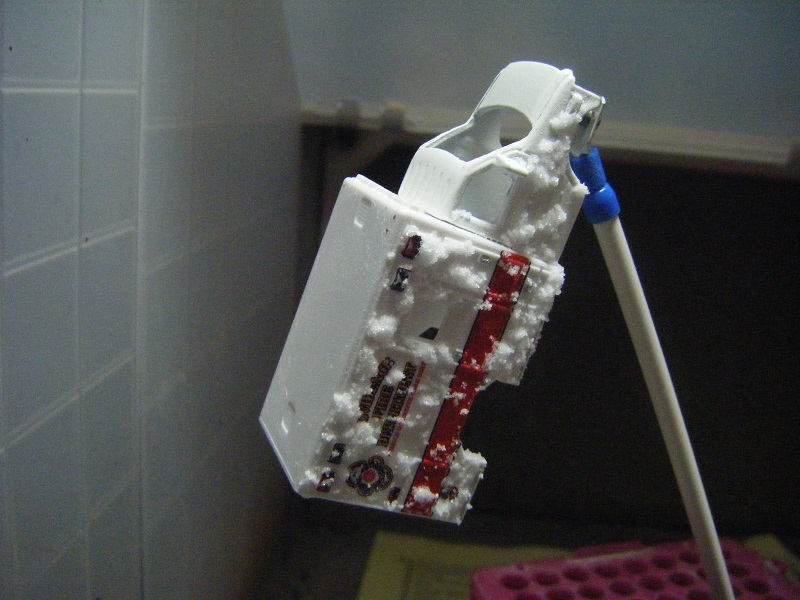
Remember those gems I bought from the pound shop? Well, I decided to do some work on those today. I primed them black, then a few hours later sprayed them with ever brighter and lighter coats of metal (from Plate Mail with a little black, through to Chrome with a little Plate Mail). Nest step will be to add colour spots (red, yellow, green, blue) on the tops to help identify which car dropped them.


Fast 4WD Car Set

I finished polishing the other three cars today:


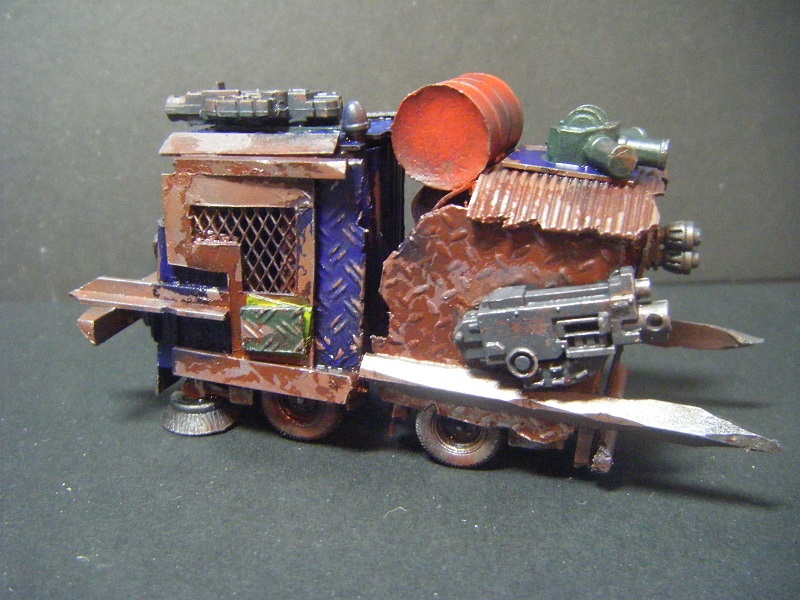
Scrap Heap Challenge

In Car Wars you need markers for debris and obstacles created by damage to vehicles, buildings etc. These represent bits of armour and bodywork blasted away by weapons fire. To this end I've been slowly working my way through the metal uppers of a bunch of cheap pound-shop cars (10 for a quid!) with a pair of tin snips to produce a pile of scrap. Later on I'll hack up the plastic parts as well. Here's what I've hacked up so far:


Purchases

I've placed a few orders online.

Amazon - some machine screws, washers and crimping tubes
Sgts Mess - various bits of scatter terrain and some weapons
Brigade Models - some weapons, plus some containers

"Yes, those all look perfectly reasonable, but you haven't posted about buying cars for a few days. Come on - admit it. You've bought more haven't you?"

Well, I might have done. I did buy a couple the other day, but they were a mix of repeats, something I saw that Lord Michael Awdrey might like and some that I knew someone on YouTube was looking for (I'm hoping t trade for some that I'm after!). Only the repeats are shown below.

And then someone in a Facebook Car Wars group asked me if I could find him some Fast 4WDs as his local stores don't seem to have them. I duly went out to the shops this morning to see if I could find them for him. I found two (he needs three). The trouble is that a few other cars somehow leapt into my bag...


The back two rows are all repeats of cars I've already got. The two trucks and the front two rows are new ones. As you can see, my usual treasure troves had done a bit of a restock since my last visit. the two red ones with silver figures were bought to see if I could extract the figures to use as vehicle crew in proper cars. I think they might work (not sure about the guy with both arms in the air...).

So, that's it - no more car purchases until next month!

Oh, and there are four "Treasure Hunt" cars in that photo - all three Enforcers and the light blue one just in front of them. And they were all from pound shops!


Plans for this week:

1. Finish the "spikes" and stick them onto MDF bases.
2. Carry on with the paint technique tests
3. Continue scrapping the cheap-as-chips cars
4. Do some vehicle prep - I might do the Enforcers, just for the hell of it.
5. Maybe - just maybe - I might start work on a "war rig" for the Wastelands - that would be a good way to kick off that project (the Oblitterator will be a prize for someone at some point)
6. Start prepping the reinforcements for my SYW Russians


Sunday 30 August 2015

Sunday Workbench

Well, rather than starting on painting Dux's prize figure or finishing painting Cyber Scooby, I've been playing with cars again.

My original intention was to do a "how to" for disassembling, prepping and reassembling Hotwheels cars. Unfortunately I made a bit of a boo-boo at one step, so I'll have to do it with another car at some point.

I decided to carry on with the cars anyway. Once all four had been taken apart, the metal bodies were put in the stripping jar overnight, then scrubbed and rinsed this morning. I then had a slightly silly thought - "what would they look like if I polished the bare metal up?". Well, you know where thoughts like that lead - out came the various grades of wet-and-dry sandpaper (180, 220, 800, 1200 and 1500 grit) and a few minutes later I had a nice shiny car. Now, I could have left it there but instead I decided to get out the Dremel and the polishing/buffing tools.


I've started polishing the other three and will finish them tomorrow.

There was another reason for trying this - I wanted to see how the Createx transparent paints would look over the bare metal - could I get the Hotwheels "Spectraflame" look that they use on some cars?


I didn't quite succeed, but ended up with a rather nice metallic effect. The colour here is lighter than the actual red - it's a nice claret colour.

I also wanted to test out the pearlescent and iridescent paints. You may remember the problems I'd had with the silver over a white primer. For this test, I primed the back of a truck black, then used a different colour on each panel.

Pearlescent Silver
Pearlescent Gold
Pearlescent Copper - needs some thinning before use
Iridescent Violet
There is a bit of a colour shift with the iridescent paint, but I think it's muted by the black primer. I'll try it over white on some scrap MDF tomorrow.

I also did a little bit more on one of the test cars (the other I put in the stripper again):


The transparent orange shows up quite nicely over the two yellows (and gold base) but I probably went a bit too heavy at the nose.

Tomorrow's my last day off work, so I'll try to get as much done as possible.

Friday 28 August 2015

Road-Sweeper Day Eight - The "Oblitterator"

Oh, come on! That name is a great pun!

Tsch! there's no pleasing some people.

Anyway, it's finally finished and what a fun time I've had doing it. Just to remind you oh how it looked before my fiendish brain and maniacal hands were set loose on it:


This morning I did the detail painting - and forgot to take photos before the next step. Then, after giving it a coat of Klear, I applied some dirty washes to represent the inevitable build-up of grime and oil/fuel leaks:


Then added some highlights on the rust and metals:


The next step was a bit more tricky - adding some writing (and some "kill" markings) using a 000 brush. That was followed by airbrushing a thinned mix of VMA Golden Brown over the vehicle to make it look dusty, going a bit heavier over the front and lower panels. I *might* have overdone it a bit, but it looks OK. It then got a coat of Vallejo polyurethane matt varnish and the lights and mirror then got touched up with brush-on gloss:


So, that's the Oblitterator, cleaning up the mean and dirty streets. It's definitely not a vehicle to mess with. To the front and rear it has flamethrowers and heavy slug guns (loaded with HE shells); there is also a rear-firing smoke discharger. The owner/driver doesn't care what anyone else thinks of him, as you might be able to tell from his hand painted message on the armour panel protecting the waste collection area - I didn't put a direct-on shot of the back as it contains rude words!


In other news, my Amazon and SnM Stuff orders were delivered today, and my Shesto order has been shipped.


So, what's next? I've still got two jobs on the list I posted at the start of my break - painting Cyber Scooby and Dux's prize figure. I might also do some work on the gems and beads I bought the other day. The gems (for dropped spikes) should be easy as they can just be sprayed on their backing sheet; the beads are more fiddly - I'll have to stick them down onto something first (after separating them from the sequins).

Thursday 27 August 2015

Road-Sweeper Day Seven

Plenty done on the road-sweeper today. I finished off the painting over the hairspray today and have done the chipping. Some of the painting was done by hand using VMA* paints as they were small areas or parts where I didn't want to risk getting the paint onto areas I'd already airbrushed.

Before chipping:


After chipping:


Tomorrow I'll do the detailing work, then add some dust, grime and extra rust then varnish it. I might add some graffiti if I can figure out a way of making it look washed out.


Test Cars

I haven't done any work on these today.I don't think there's much I can do with them until I get some flame masks.


Purchases

I placed a couple of orders last night:

SnM Stuff - some 60ml bottles of Vallejo polyurethane varnish (gloss, satin and matt) plus a spare nozzle for my Neo airbrush. It was a couple of hours later that I remembered a couple of things I should have ordered at the same time - including some stencils from Anarchy Models

Shesto - some Createx paints (including an iridescent colour)

LE Diecast - some vinyl flame masks

Amazon - transfer tape for applying the masks


I also made another trip to Toys R Us this morning (no mistakes on the buses this time!). The Hotwheels singles pegs were nearly empty and there were no cars there I wanted. I tried the Sainsburys just across the road - none there either. Got the bus back to turnpike Lane and another down to Harringay - nothing in Sainsburys, but I did find a couple in Poundland:


The only new one - a Mastretta MXR
The Mastretta takes my count to 24 new car models; a big fat zero left on my allowance. Yikes - I can only buy repeats now!

On the subject of my purchases, I found something out about the Enforcer I bought the other day. It appears that I have managed to get hold of a "Treasure Hunt" car. For every release of cars to distributors and retailers, Mattel do a limited edition run (about 25,000) of a particular model which get randomly added to the wholesale boxes - these are indicated by circle flame logos on the car and on the backing card of the packet.


They also add another limited edition type into each release - the "Super Treasure Hunt", which are a variant paint scheme of another car in that release. The variant scheme is a transparent colour applied over (presumably highly polished) bare metal rather than over primer, and usually with addition decals. they also have the rubber "real rider" tires rather than the normal plastic ones.

Both can be worth more than the retail price to collectors if they are "mint in box". As I've opened the packing (and made a right mess of the card backing) I won't be able to make any money of this one, so I can strip and mod it as planned.

Wednesday 26 August 2015

Road-Sweeper Day Six

Where did I leave you yesterday? Oh, yes. That's right. I was going to buy some hairspray so that I could do a comparison test of the hairspray and salt chipping methods. So, that's what I did first thing this morning. It seems that all my shopping trips so far this week have involved getting soaked by the rain...

"Hah! She went to the shops - I'll bet she bought a metric tonne of cars!"

Hah! You'd be wrong. I didn't buy any cars today! Okay, I'll admit - I did look, but there weren't any of the ones I was after, so that's why I didn't buy any.

Anyhoos, once I got back I set to work on the trial vehicle. The left side got two light coats of hairspray, leaving it to dry for ten minutes or so after each. Then the right side was subjected to the salt. First, a little water was applied by brush to areas of the surface to be chipped; salt was then shaken over the water; after a few seconds the excess salt was removed by gently tapping the vehicle. I then left the vehicle for 2 hours to give the remaining salt time to set into a crust.


I probably used too much water and at this scale I should have used just table salt rather than mixing it with a little rock salt.

After a couple of hours, I airbrushed both sides with black paint (to show up the contrast when I do the chipping):


I'm not sure what happened on the left side - I'm guessing some sort of reaction between the hairspray and the paint.

I then let it sit for a while before doing the chipping. This involves adding a little water to the areas you want to treat, then "chipping" or rubbing the paint with a stiff-bristled brush. I started on the salt side, then did the hairspray side. Here are the results:


Conclusions:
1. Both techniques work well
2. For the salt method, I need to use less water, table salt only and be very selective about where I place it
3. The hairspray method is much quicker, less messy and allows better control of the chipping.

Given my conclusions, I decided to go with the hairspray method for the road-sweeper. I gave it two light coats, then left it to dry for a couple of hours. I then started airbrushing panels and stuff in different colours. I didn't get them all done as my airbrush seemed to be getting clogged. I'm not too surprised as it has been a while since I gave it a thorough cleaning.

So, I've spent the last hour or so stripping it, cleaning it (cotton buds, nylon brushes and two 8-minute blasts in the hydro-sonic bath), lubricating the parts and reassembling it. It works really well now. I've just started work on the other airbrush as it is probably just as bad.


Test Cars

I sprayed them with their second transparent colours this morning - Sunrise Yellow and Turquoise. The colour gradients don't show up very well in the photos, but look quite good in non-digital form. Admittedly, the "yellow" would have looked better with an orange second layer.


I think with the Createx paints that I'd be best off using the Revolution rather than the Neo - the larger needle size should help ensure a better flow and avoid some of the "splats" that you see on the blue.

I suppose I really should order some vinyl flame masks so that I can finish the test properly. And the transparent orange and opaque red Createx paints. Maybe some other Createx paints as well - I quite fancy seeing how the iridescent ones come out.

Tuesday 25 August 2015

Road-Sweeper Day Five

I did manage to get some work done today on the road-sweeper and the test cars.

Road-Sweeper

After breakfast this morning, I airbrushed the vehicle with a mix of VMA Light Rust and VMA Hull Red (roughly 3:1). I then set it aside for a few hours, to allow the paint to dry and cure. At lunchtime I dry-brushed heavily over the rust colour with VMC Natural Steel. Earlier this evening I airbrushed a protective coat of Klear over the whole vehicle. This will provide the basecoat for the "chipping".

Pics taken pre-Klear:

Rust spray:


Dry-brushed:


I was intending to use the salt method for the chipping, rather than the hairspray method, but now I'm unsure. I've decided to do a test to compare the two methods. Naturally, I don't want to do that on this model, so I've drilled out the rivets on one of the many diecasts in my collection. I also tapped the rivet posts to take 2mm screws.


The holder attached to the vehicle is one of a batch I made up the other day. I'd seen them used by someone on YouTube and realised they would be much handier than the blue-tac-on-top-of-dropper-bottle I have been using. It consists of a 20cm length of 4.5mm styrene rod glued into an electrical connector with epoxy. The blade of the connector has had its hole enlarged to take 2mm screws, then bent at an angle.

Close-up pic
I'll do the comparison test tomorrow - I don't have any hairspray, so I'll need to buy some.


Test Cars

Having let the pearlescent gold coat dry and cure overnight, I added the first transparent coats this morning. These were Brite Yellow and Caribbean Blue.


The Brite Yellow gives a very nice brass/burnished gold look.


The Caribbean Blue didn't seem to want to cover the gold very well at first. And then I noticed that I had the pressure set much higher than yesterday. D'oh! When I turned the pressure down it seemed to work much better. I'm pretty sure the blue will work better over silver than it does over gold (they didn't have the silver in stock yesterday).


As I had a bit of dead-time this morning, I decided to see what Hotwheels the Sainsburys in Tottenham had. The only problem was, that when I got there it wasn't a Sainsburys any more - it's now a DIY store. Thinking my trip had been wasted, I headed back towards the bus stop to go home. While I was waiting for the lights to change so I could cross a side road, I happened to look left and what did I see? The new Sainsburys! I popped in and had a look, found the relevant aisle and found one car that I was after. I also did some household shopping while I was there.

The "Enforcer":


That takes my count to 23 new car models; 1 left on my allowance.

"Hang on, what's that on the left of the top pic?"

Drat! You've caught me out.


Yes, another Flashfire 5 Pack. There were actually two on the shelves, but I restrained myself and just bought one. These will be kept as they are rather than used for custom paint jobs. Well, the hotrod might get used for the "wastelands" project, but the other 4 will stay as they are.

That's all for now folks!