About Me

My photo
London, United Kingdom, United Kingdom
A mythical beast - a female wargamer! I got back into wargaming in the summer of 2011 after a very, very long break and haven't looked back since. I must admit that I seem to be more of a painter/collector than a gamer, but do hope to correct that at some point in the near future. My gaming interests span the ages, from the "Biblical" era all the way through to the far future. I enjoy games of all sizes, from a handful of figures up to major battles (see my megalomaniacally sized Choson Korean and Russian Seven Years War armies).

Saturday 29 September 2012

WIP: Painting Helga #3; WIP: Andy's Prize Painting - ECW Cuirassiers #2; On The Workbench

Well, as promised, here are some pics of Helga in her finished state:


Andy's ECW Cuirassiers

Metallic bits painted, Klear/ink coat done, matt spray varnishing still to do. There's not much visible difference since the previous post, so I haven't taken pics of them but will once the matt spray is done.


On The Workbench

I've finally got back to doing my 30YW stuff. On the workbench at the moment are some dragoons to make up my existing units to 4 bases each; 2 draft horses for one of the wagons I painted up a few weeks back; some artillery supplies for a camp base; a farrier grouping (horse, farrier, horseholder) for another camp base; and an officer who will be the "(very) Camp Marshall).


I won't be doing any painting today as I have to head down to Sussex for my big sister's 50th birthday gathering. Depending on what time I get back to London tomorrow I may or may not get any painting done then.


Friday 28 September 2012

WIP: Andy's Painting Prize - ECW Cuirassiers #1

I didn't do any painting last night, although I did go over the armour and glossy bits for Helga with brush-on stain varnish. I guess I ought to take some finished pics - I'll do that tomorrow.

Anyway, this evening I have almost finished painting Andy's cuirassiers. I just need to do metal details, give the armour a wash of black ink, Klear/ink coat the figures then spray with matt varnish.

So, here are some pics of them in their current state:


Dux - in case you see this post before you check your email, your Paras got posted this afternoon so should be with you shortly!

Tuesday 25 September 2012

WIP: Painting Helga #2

And she's done, apart from matt spray then brush-on satin varnish on the armour and other bits which should be slightly shiny.

I think she's come out really well. She certainly looks as though she's seen some hard campaigning, all the while maintaining her lovely pale complexion *lol*


These pics were taken before I gave her a coat of neat Klear, then a black wash over the non-flesh/hair areas and brown wash over the flesh and hair.

Sean's comment on my last post got me thinking. A few months back I was planning a SciFi merc unit "Barbera's Bunnies" and this figure would be great for Colonel Barbera. I must have been subconsciously thinking of that when I was doing the colour scheme for her as it's pretty close to the uniform colours for the Bunnies. It's just missing a bit of pink *grin*

Andy's Prize Painting - ECW Cuirassiers

I've also done a bit of work on these this evening - saddle cloths, horse shading washes and markings. I should be able to finish these quite quickly now that Helga is finished.


WIP: Painting Helga #1

Well, at a loose end after making a start on Andy's cuirassiers (armour and pistol barrels dry-brushed with Gunmetal Grey; base-coats on horses) I decided to make a start on painting Helga. I've put down a couple of first layers - face and hands, hair, jump smock, trousers, puttees, boots and armour. I think the colour combination works OK - what do you think? Do bear in mind that these are the base colours - they will get lighter with the next layer and the highlights.

I still need to work out what colours to do the equipment and the cuffs and collar of the smock.


Monday 24 September 2012

WIP: Dux's Painting Prize - Paras #3 (lots of pics)

It was still pishing down this morning, but as there was little or no wind I took the risk of opening my windows to provide the ventilation I need to do spraying. Luckily no rain got in and Dux's Paras and Andy's dragoons got the matt spray they needed.

I popped along to the club this evening to hand Andy's dragoons over - once he's based them I'll try to get some pics of the fully finished article. It was another busy night at the club, with 9 games going on, plus myself and another member lurking. I stayed a bit longer than I'd originally intended because I got caught up in watching a couple of the games.

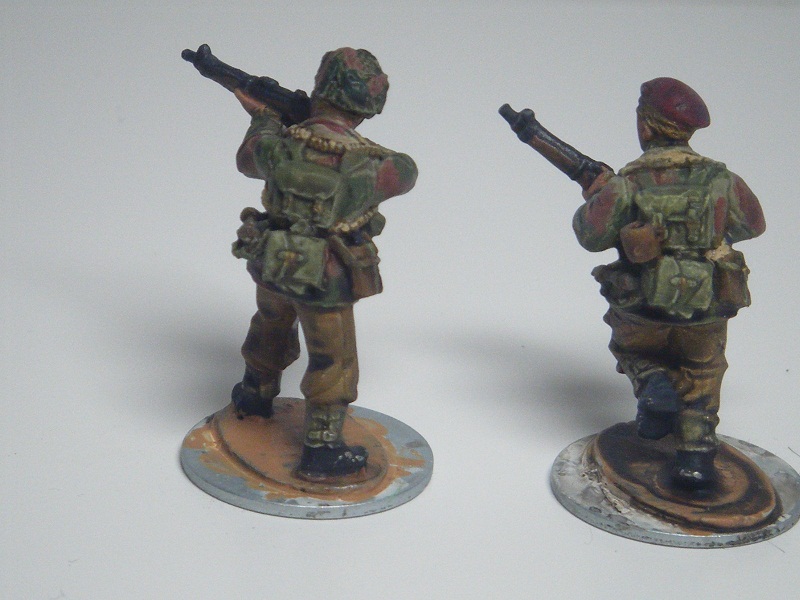
Still, I'm back home now, Mad Max 2 on in the background as I type, have photographed the Paras in their matt state and resized the files for posting here.

Enough of the blurb, here are JPEGs:


As I was resizing the pics I did spot a couple of areas that are still slightly glossy, so I'll give the figures another burst tomorrow. I also spotted that I didn't do the helmet straps properly - I forgot that the strap splits around the ear so I'll need to do the rear parts - no sweat.

I've learnt a couple of things doing this:
The pre-shading wash needs to be darker (and probably more concentrated)
Thinning the paints down gives some really nice shading effects - this is particularly evidenced by the webbing, which got a single coat of thinned paint
I need to be a bit more careful about mopping up excess Klear/ink
This technique works well for 28mm and 54mm, but 15mm figures would probably be too fiddly for it to work properly, although it might work well for Middle Eastern and Oriental types and on things like cloaks.

I've really enjoyed painting these for Dux. They are very nice, detailed sculpts which were easy to work on (my only negative comment was the amount of flash on these figures, but they may have been old stock - Warlord Games appear to have changed the description of the pack from "British Paras" to the more accurate "British Airborne").

I've avoided WW2 for myself so far, but would be tempted by these figures to make that leap at some point. Yes, yet another period and army to go on my "to do" list.

Sunday 23 September 2012

WIP: Dux's Painting Prize - Paras #2

And they're done! Well, apart from being sprayed with matt varnish. Before doing my normal Klear/ink coat, I gave them a coat of 50% Klear so that the ink would flow into the crevices and recesses better. I'm glad I did that, as I didn't want to obscure the shading effects from the painting itself.

So, here are some pics of them in their glossy state:


I'm pretty pleased with them - I hope you like them Dux. If you do, your mission is to go into a bar in Aldershot and say loudly "My mum told me only fairies have wings - she was right!" (kidding! It's really to go into a bar in Hereford and say ....)


I've also made a bit of a start on Andy's cuirassiers - horses base-coated white, armour and pistol barrels base-coated black. His dragoons are still waiting to be matt sprayed - it's been tipping down today, so no chance of opening windows for ventilation. Hopefully I'll be able to do the spraying tomorrow morning for the dragoons and the paras.

WIP: Dux's Prize Painting - Paras #1

Well, after I'd posted yesterday I realised that I needed to do another test figure as there was an important item I'd not done colour test on - the beret! A quick root through the pack gave me an officer type in a beret, which I quickly cleaned, primed and washed. Once the wash had had time to dry, I set about painting him up suing my revised colour scheme. Here's the result, alongside the first test figure for comparison.


I was happy with the revised scheme (I had to adapt the webbing colour though as it was too close to the base colour of the smock), so decided to crack on with the 28mm Paras for Dux. I have made one change to the process though - rather than mixing the colours, I decided to try a slightly different approach, using a thin dark coat, followed a bit later by a thinned lighter coat. this seems to have worked quite well. For the berets I actually did a three-step process to get the richness of colour I wanted.

Note to Dux - I've been writing up a painting guide in case you want to replicate them for any reinforcements you add to the section.

I managed to get quite a bit of the way through doing these last night. I've probably less painting to do today, but as it's more detailed it will probably take me just as long.

Having forced you to read all that crap, here's your reward - the WIP pics:


Of course, this does mean that I'll probably be posting twice today so you can see what progress I've made. These are very nice figures to paint, and despite the extra steps they are painting up very quickly.

Saturday 22 September 2012

WIP: Dux's Prize Painting - Test Figure

OK, having stripped the primer and wash off the 2 figures, cleaned up the mold lines I'd missed, re-primed and re-washed them I had a sudden thought.

"Hmmm. I'm going to be trying a) a new technique; b) painting a camo pattern I haven't done before. I really ought to do a test figure to check if the technique works (and find out how much I need to thin the paint down) not to mention checking if the colours I was planning to use are right."

I didn't want to use one of Dux's figures for this, but a quick hunt confirmed my suspicions - I did have a pack of Airfix 1:32 scale WW2 British Paras. So, I grabbed one of the figures from the pack, gave it a good scrub with warm soapy water, rinsed and dried it and set to work priming and washing it. I discovered that the plastic did not like having primer applied, but persevered and got it coated in the end. Once the primer had dried I did the pre-shading wash, then left it overnight.

This afternoon I started work on the test painting. Here's the result (one of Dux's figures alongside to show size):


The metalwork on the Bren doesn't look quite so shiny and the pre-shading does show through somewhat - there are subtle differences in the shading of the colours.

I discovered the following:

I didn't need to thin the paints quite as much as I thought (I think the drops from my wash-mix bottle are larger than the ones from the Vallejo paint bottles)
The base colour I'd used for the flesh (Saddle Brown) was a bit too dark, although probably about right for the lips. It might be OK for a final shading wash.
The base colour I'd used (mix of Pastel Green and Brown Violet) for the Denison smock was too light - I'll use a mix of Green Grey and Brown Violet instead.
The red-brown I'd used (Red Leather) for the Denison brush strokes was too light - I'll use Mahogany Brown instead. The Red Leather will, however, make a good base colour for the flesh.
I'm happy with the rest of the colours.

I'll make a start on Dux's figures this evening.

New To The Painting Queue

Well, with the ECW Dragoons for Andy waiting for their matt varnish spray, I needed to get some more figures prepped for painting. Last night I cleaned up the flash etc on Andy's ECW cuirassiers, the Dux's WW2 Paras and Helga.

This evening I have done some more work on them.

Andy's ECW Cuirassiers

Nice and simple - glue onto painting sticks; prime with grey gesso. I won't be able to start painting these until Sunday as the gesso needs to cure.


The Dux's WW2 Paras

Glued onto 20mm washers to facilitate painting; primed with Vallejo white polyurethane primer; washed with diluted mix of my brown and black ink washes (8 drops brown, 2 drops black, 20 drops water) to provide some pre-shading and definition of detail.


Unfortunately, as you can see from the photos above, I managed to miss some mold lines on a couple of the figures, so I'll have to strip them, clean the mold lines and re-prime them. Also, it is clear that the Bren gunner's face was somewhat miscast - however, the way it came out I can probably get away with painting below the eyes as a scarf pulled up as a "mask".

I'm going to be trying a new (for me) technique to paint these, basing it on this guide on the Peabody Here! blog.


Helga

This deliciously malicious young lady has been glued to a 32mm washer which was then covered with coarse acrylic texture gel. Once the gel had dried, the whole lot was primed and washed as per the paras.


Doesn't she look fab? Well, she'll (hopefully!) look even more fab when I've finished painting her. I've got a colour scheme in mind now for the base colours:
Armour - Hull Red (possibly with a bit of metallic medium or Bronze paint mixed in)
Jump Smock - Dark Prussian Blue
Trousers - Royal Purple
Hair - well, as she'll be "me", she has to be a natural redhead (I am *NOT* looking forward to painting the freckles though!)

The base colours should provide a good contrast to each other, whilst also complementing each other at the same time