About Me

My photo
London, United Kingdom, United Kingdom
A mythical beast - a female wargamer! I got back into wargaming in the summer of 2011 after a very, very long break and haven't looked back since. I must admit that I seem to be more of a painter/collector than a gamer, but do hope to correct that at some point in the near future. My gaming interests span the ages, from the "Biblical" era all the way through to the far future. I enjoy games of all sizes, from a handful of figures up to major battles (see my megalomaniacally sized Choson Korean and Russian Seven Years War armies).

Wednesday, 16 June 2021

Wednesday Workbench 16 June - Including Some Finished Bits


That's what is currently on the workbench. I've since done a little bit more work on them:


I realised after I'd started adding herbs to the bases that I'd forgotten to drybrush the texture gunk I'd added. The drybrush colour looks a bit stark right now, but should become muted as various washes and glazes are applied.


I've now added texture gunk to the kunai grass bases. Tomorrow I will be painting and drybrushing that, then adding some 10mm static grass. These kunai grass bases will be removable from larger bases.


Finished Bits


Having done a test of edging the bases with turf mix, I think that bases done that way would be fine for scatter in clearings, but it doesn't really work for secondary jungle pieces. I'll probably do a few more scatter bases like that, but for the most part will stick with the herbs for edging the bases.

Note To Self: wear gloves when adding the scrub & PVA mix to avoid this:


I keep forgetting that my scrub mix includes Javis scenics, which use dyes that leach when wet.


I think I will add some static grass around the dungy when I am doing some other pieces - it's not worth getting the kit out to do just this one item.


These barrows will eventually be added to the base of one of the plantation buildings.

The barrows and outhouse are from Warbases.


Foam Fun


Do you recall the first test batch that I combined with the craft paint tests from the second batch? Well, it eventually dried fully, but it hadn't really clumped so I decided to blitz it down using a cheap coffee grinder. I then sieved the result to separate the finely ground foam from the coarser bits. Looking at the two tubs above, it seems that the coarser bits were from the middle of the foam pieces and hadn't absorbed much paint during the mixing. They're a decent crumb size now, so I might try using them for another test batch.

About a week ago I had chunked and blended the foam from another 3 car wash sponges. Having seen the results of the first few test batches, I took a look at the foam again and realised that I would need to blitz them down smaller.


They went from filling a 9L RUB to a 7L RUB.

The test batches using kitchen scourer foam (and grey figure tray foam) finally dried out. 

Tamsin's Tips: Don't try drying batches out in plastic containers - the top layer will foram a crust that seals in the rest which then can't dry.


They have clumped quite well, the bits which were originally on top at least. I suspect that the longer the paint/glue mix takes to dry, the less it will clump.


Twenty Double (Not Face) Palms

I got these forty palm trees painted:


These palms will be used as filler for primary jungle and possibly for swamp bases.


"Yes, Sir, We Have No Bananas..."

Well, not yet perhaps, but we soon will have.  The first eight banana plant "trunks" are ready for priming:


I'm still debating whether to bother with priming the leaves for these; I might try simply drybrushing them. If that doesn't work out, then priming them won't take too long.


Arrival of Goodies

First off, some (more) aquarium plants arrived that I'd ordered off Ebay and Amazon:


When I unpacked the mat on the left, I realised that I'd accidentally closed the wrong tab - I'd intended to order the dwarf version which are 4cm tall rather than 15cm! I've now ordered the correct ones.


The middle batch were some nice dwarf ferns. I might order another mat of these.

Edit: As a couple of people have asked in the comments, here's the link to those ferns on Ebay: https://www.ebay.co.uk/itm/233962787972

Update - it seems that they are now sold out on Ebay - using this Google search term you should be able to find some aquarium suppliers with it in stock: Aqua One Ecoscape Mat fern


I also got a slightly heavy parcel from Timecast today:


It contained these:


They are the reinforcements for my Choson Korean and Ming Chinese armies.


Monday, 14 June 2021

Podcast #81 - The Coming Out Stories Episode

 In a slightly astonishing turn of events, I'm posting the link for the latest podcast episode within a couple of days of it being published.

The "So, what have you painted since the last episode" discussion takes a detour this week into our stories of coming out at work as, errmm, wargamers. Which turned out to be quite handy as only a few of the less-than-magnificent seven had actually painted much worth talking about.

In this episode:

  • Jokes about my herbal highs continue
  • Timmy reveals that dodgy geezers offering you dodgy goods at Watford Gap services is still a thing
  • The great debate of Cottage Pie vs Pizza as appropriate wargaming food
  • "I'm Sorry, I Think You're An Arse" makes a welcome (Are you sure? Ed.) return
  • Andy's Quiz


Sunday, 13 June 2021

Finished: Jungle Test Pieces

Well, they're done. This morning I mixed up a dark brown ink wash and glazed it over the plastic plants to mute the colours a bit. This afternoon I hit the pieces with a good spray of matte varnish.


 These six pieces cover the best part of an A3 sheet (420 x 297 mm/16.5 x 11.7 inches) which is somewhere between the minimum and maximum terrain sizes I'll want. I probably need to do another 2-3 more batches, some of which I will do to be more open allowing figures to move through.

Some photos of the individual pieces (28mm Australian Commando for reference):


Thoughts and Lessons

Theses have come out rather well, but there are a few things that need changing.

1. A lower density of plants would be better; these bases were rather crowded which made adding the underbrush and scrub a bit difficult.

2. It would be better to apply the brown ink glaze to the plants before adding the scrub.

3. I'm not keen on the look of the coir "under brush". I think they might look better if the bunches are trimmed a bit before adding them. Smaller pieces would also be easier to add to the bases - I might make a few up to test that out (much easier than cutting up the larger ones I have already made).

4. The clump foliage looks a bit artificial in places. I suspect that is a result of not having blended the foam down small enough, but they were from an early test batch. I think some lichen along with the clump would look good.

5. I'm not sure about the base edges; with the herbs going to the very edge they won't blend in on grassy battle mats. I might do a test base using the turf and static grass system I used on the hills. 

Paint Table Saturday 12 June


 The pic above shows just a part (OK, almost all) of what I've been working on today. It's pretty much all been drudge work to get things ready for later on.


Jungle Test Pieces

Since my Wednesday post I have been working on some test pieces of dense secondary jungle. The first step was to add some mixed dried herbs to the edges of the bases:


After letting the glue dry, they were "fixed" in place with a mix of dilute PVA and brown paint. I then glued some ends of cocktail sticks into the foam mounds:


They were then painted brown so that they won't stand out; I also glued a bottle palm onto one of the bases:


The next stage was to add vegetation (assorted artificial plants and a couple of trees):


I started that off using the hot glue gun, but switched to PVA - most of the plants were being anchored on the cocktail sticks, so PVA should be strong enough to keep them in place.

I then added some of the coir bunches in the deepest parts to represent coarse underbrush:


After that I added some clump foliage around the edges:


I let the PVA dry for a few hours before "fixing" them (using the same mix as for the herbs - I should have used dilute PVA).


After leaving that overnight, I added some "scrub mix" (a mix of chopped up lichen, coarse foam and clump foliage). To make it easier to apply, I first mixed up a scoop of it with some 50% PVA. I then spread undiluted PVA on the bases where I wanted to apply it, then added the scrub/PVA mix to those areas:


This morning I applied a thin coat of scenic cement (10% matte medium) using my cheapo siphon-feed airbrush: 


Tomorrow I will be airbrushing a brown ink glaze over the more garish vegetation to tone them down. Once the glaze is dry, I will hit them with a spray coat of matt varnish.

I've got a few more bases prepped for some more test pieces:


Some of these have 5mm foam, the rest have 10mm foam. That is to help me decide which is best for holding cocktail stick ends and some of the plants. I might do these as more "open" secondary jungle.


A Box Of Goodies

This box arrived this morning:


And this is what was in it:


Two packs of Terrain Tiles (20cm x 20cm and 30cm x 30cm), a Far East Village bundle, an equipment shed and a water tank. The last two will be for a plantation admin centre.


Foliage Experiments

Yesterday I began the experiment with the kitchen scourer foam. When I checked them today, apart from the top which was dry, they were still very, very wet. I realised that I had used far too much of the paint/PVA mix for each batch, so I took them back to the kitchen and carefully squeezed out the excess, then left them to dry.

The different sponge colours definitely affect the final colour:

Clockwise from top left: Yellow, Pink, Grey, Blue


Painting Base Bottoms

Most of my workbench time today has been spent painting the undersides of bases:

Terrain bases from Charlie Foxtrot

Terrain Tiles from Sarissa Precision

The terrain tiles are for plantations. I now have enough to do three maximum sized (24" x 24") of them. One will be for bananas, the other two will be for rubber trees or palms. This evening I have been adding MDF "washers" to them (my restock arrived). I got to the final tile and realised that I'd made a mistake on my order - I'd miscounted how many I needed and found that I am 13 short. Oh, well, Warbases will be getting another order from me tomorrow I suppose...


I Love The Smell Of MDF In The Morning...

I've also been prepping some bases for the banana plants and for stands of bamboo:


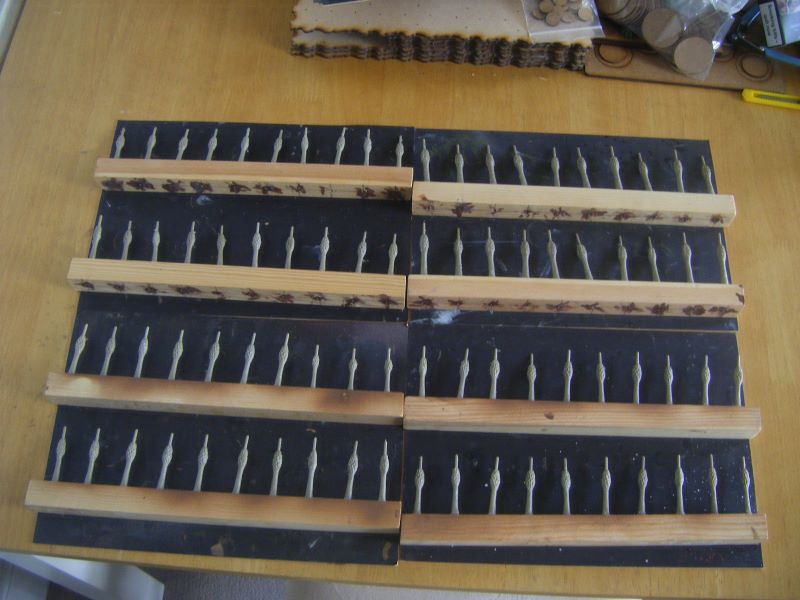
As the banana plants are a little short, I'm elevating them by gluing a 15mm round base on top of the 25mm base. I then drill through both layers for the pegs on the bottom of the plants to be glued into.

For the bamboo stands, I'm doing something similar, but for a slightly different reason. I drilled a couple of holes into a scrap piece of MDF to see what size holes the bamboo stalks would fit into nicely. I soon realised that I would want a slightly thicker base for them to glue into. So, 30mm bases on 40mm bases. I should be able to get 4-6 stalks onto each.

With my most recent Warbases order, I also got a couple of small pieces for my plantation complex. I assembled them yesterday:

Whoops! I photographed the rear of the outhouse, not the front!

I added some corrugated card to the roof of the outhouse to represent corrugated iron. I'll be priming them tomorrow, along with these:


I'll have to do the fronds in two batches as there are so many of them (4 bits for each tree; forty trees).

I've Gone A Bit Bananas!

"We knew that years ago!" 

Well, quite! In this specific case, what I am talking about is having disassembled and prepped eighty miniature plastic banana plants:


I've separated the fronds out into the different levels. If everything goes well, I should get them primed and painted this week. I've also ordered another eighty as I will need 144 for a 24" x 24" plantation. I've also ordered more coconut palms and various non-palm trees (for rubber trees and primary jungle).


As a final note, in case you are wondering about the black mats in some of the photos, here is what they are:


That's right - rubber "Welcome" mats from Poundland. They are great for jobs like this as the little spikes mean that any wash or dilute PVA that runs off don't stick your bases to the surface. They are also much more convenient than sticking your pieces on top of paint pots.