
Entry #12 - "Scum of the Universe" [link]

Entry #13 - "Tamsin To The Rescue", my Snowlord's Peak vignette [link]
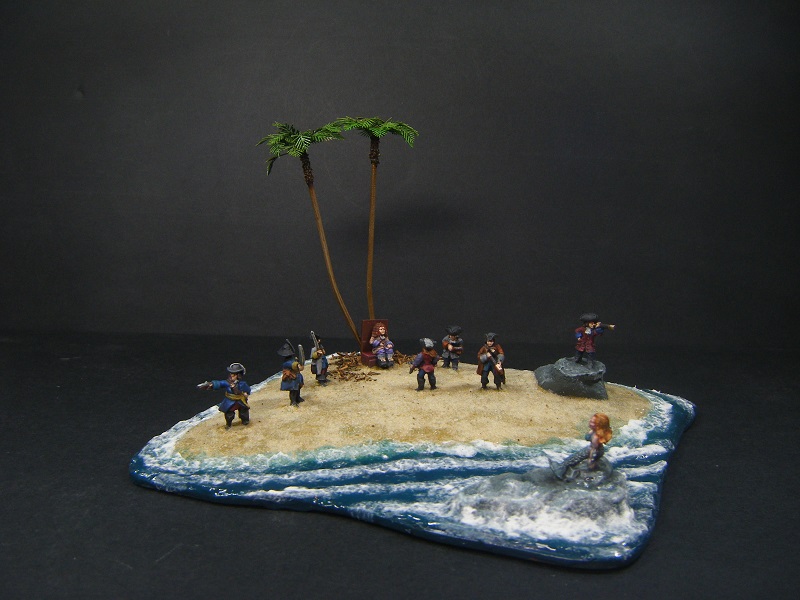
I thought I might include some WIP pics here of the island:
Base covered with a mix of filler (spackle), PVA glue and paint (black and German Uniform):

Water colour base coat applied (Dark sea Blue):

Sand base coat (Yellow Ochre) and water highlight (Blue Green); rocks painted and highlighted (various greys and greens):

Palm trees fixed in place, sand added, stained dried herbs added around base of palms; everything sealed with PVA:

Preparing to add water effects - masking tape around terrain base and a bead of water effects added to create a seal:

The morning after adding Vallejo "Still water" (coloured with a 1:2 mix of Dark Sea Blue and Blue Green):

Masking tape peeled away; horrible meniscus:

It was at this stage that I discovered that the cured "Still Water" had a consistency like rubber which proved rather resistant to being trimmed with a knife. I resorted to scissors. This was also where I discovered that the wavy edges made trimming with scissors awkward - chunks at the edge ended up being torn away and in a few places it lifted at the edges.
I had to add a bit more water effect to "glue" the lifted areas down and some more on top and around the torn chunks to try to hide them. That wasn't a complete success, although it did look much better. It also meant another overnight wait before I could move on to the next step.
First application of gloss Mod Podge to add wave texture. A applied a fairly heavy coat all over the water and "rippled" it with blasts of air from my airbrush..

I left that overnight to dry, then added some more defined waves yesterday morning. They had cured by the afternoon, so I added white froth by stippling some of my snow texture mix on them.
It will probably be a good few days before I have another submission, but it's going to be a biggie. I expect you will see quite a few WIP pics as it progresses.
The stronties look awesome Tamsin, and the deyailed pictures of your vignette were excellent
ReplyDeleteLovely work on the SD stuff Tamsin
ReplyDeleteBravo Tamsin! Brilliant both, but the vignette is a fabulous piece of work.
ReplyDeleteVive la courage! Nice mix of colours - which I may imitate!
ReplyDelete