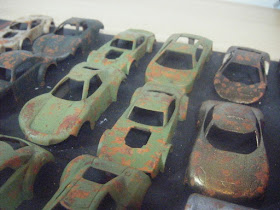
Lots and lots of Gaslands goodness this weekend. As you can see from the photo above, I've been rather busy.
On Thursday I took the other 41 cheapo car bodies into work to spray prime, then gave them a wash of Agrax Earthshade on Friday evening. Yesterday I sponged on rust colours and then stippled on hairspray with a brush.
 |
| Should have taken a close-up pic to show the rust effect. |
Of course, when I did the hairspray step I forgot that I hadn't hit them with spray varnish, but decided to go ahead anyway and just test a couple of cars before proceeding with the rest. Luckily it wasn't a disaster at all - maybe it's just with the salt technique where it's needed? After the two test cars I did the rest in batches, airbrushing the coat colour, letting it dry for a while and then chipping before repeating for the next batch.
And here's how they look:
 |
| The two light greens are actually subtly different shades. |
The first 9 cars are finished for now - the plastic chassis and insert parts have been painted & rusted and the cars reassembled (handily these were screwed rather than riveted).
I'd used the second six to work on the hairspray technique, stippling it rather than painting it on. I think the effect looks much better than my first try:
 |
| Original salt; batch 2 hairspray; original hairspray. |
When the other 41 are finished, I'll be givign them all a dirty wash or two to weather them, then they'll be used to make up some scatter terrain.
I've also been gradually working on the battle-bus. It's mostly done, just some details that need adding. The only problem is that I need some 1mm brass rod which I've discovered I've run out of and had to reorder. And some more 2mm brass road, which I have also run out of and forgot to order - drat!
Anyway, WIP pics of the battle-bus:
 |
| Crew pit with ledge for stocks of grenades, molotovs etc... |
Not all of those wheel hubs are for the battle-bus - they're just going to get primed and painted together.
While I'm waiting for all the bits I need to arrive (and for the weather to improve so I can do spray priming) I'll have to find something to do. Maybe start prepping some vehicles for a couple of teams for Gaslands or maybe it's time to paint that test figure for my WW2 Aussies.


Just like me, do the job then read the instructions to see how it could have been done better!
ReplyDeleteI think the cars are excellent, I especially look forward to seeing them weathered!
What a lot of work been going on and what do you do work wise to be able to take stuff in for spraying?
ReplyDeletelooking good so far, can't wait to see them finished!
ReplyDeleteSo that´s how the rust Thing is done on vehicles and the like..I´ve read before about hairspray and salt but you´re Explanation has made it clear to me now.
ReplyDeleteDo you every do small projects? Amazing Tamsin, just amazing.
ReplyDeleteVery impressed with your output and th weathered paintwork looks excellent.
ReplyDeleteWow that weathering looks great.
ReplyDelete@ Herkybird - yup, although in my defence I had watched one video where the guy painted the hairspray on in selected areas... :)
ReplyDelete@ dannoc - My office is close to a loading bay, so I'm able to take them out there during breaks for spraying [or as a colleague pointed out today, I could use one of our many fume cupboards like he does] :)
@ Don M - cheers! :)
@ Paul - what I missed out from my explanation was that for the chipping step you need to wet the model with water, leave it a short while to work through the paint layer and start rehydrating the hairspray then tapping the model with a stiff brush [an old toothbrush is good for this] in the areas you want the rust to be showing through.
@ Michael A - small projects? What, pray tell, are they? ;)
@ Lee - thanks! :)
@ Simon - cheers! :)
I'd get some funny looks if I took stuff to work! And with only 1/2 hour lunch break it would be time to put them away as soon as I got them out.
Delete