Well, you want to know what I was doing with the airbrush. I probably should have taken some photos as I went along, but in true Tamsin fashion I completely forgot.
No, I am not going to go back and redo everything just to get photos for you. You'll just have to make do with the pics I have taken at the end and some explanatory text.
 |
| All the bits the airbrush hit today |
 |
| Hover drones |
 |
| MAWPs (Mobile Autonomous Weapon Platforms) |
The drones and MAWPs were primed black. I then gave them a base coat of German Green. It didn't look right, so I went over them with camo dark green.
 |
| NSL Power Armour with SAWs and Plasma guns |
 |
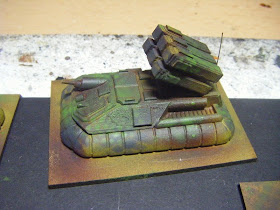
| The hover vehicles |
The hover vehicles were primed with German dark yellow (dunkelgelb). The first layer of camo was hull red. The second was dark grey blue (mainly because I somehow couldn't find the bottle of panzer dark grey out of my collection of a massive eighteen bottles) which I sprayed through the diamond-pattern mesh. This did work in patches but was awkward to get right - getting the right combination of air-pressure, trigger depression, distance of brush to mesh/model and distance of mesh to model was a complete pain.
The final colour in the camo pattern was camo light green. This was sprayed a bit more successfully through the mesh with round holes. Although it does look rather bright now, that should get toned down when the models are washed.
I must say that for getting these done, the airbrush and compressor were well worth the small amount of money I paid for them.
The mesh does work, but will need a lot of practice. I think that I might have gone a little too busy with the camo pattern on these, but I'm not going to go back and redo them.
Once the airbrushing session was over I finished off the ACW artillery and infantry. The basing texture was drybrushed, then I glued the guns onto the artillery bases. After that was the flocking, then finally adding flags to the infantry. A quick photo session and then it was time to write up the post. That's all done and all it needs now is Curt's blurb and to be posted.
Update - while I was writing this, Curt has posted the ACW. Linkypoos
Tomorrow's plans
The airbrush will see some more duty tomorrow. I've got a couple of bits to do on the hover drones and then I will be testing colour schemes for the ESU spaceships. If I'm happy with them, I'll get them all done.
The main job for tomorrow though is to do the detailing on the hover vehicles. Assuming I don't spend too long on the spaceships...
Plans For Next Week
1. Complete painting of the hover vehicles and do the basing
2. Paint up the MAWPs, drones and NSL power armour. I might even be able to do those during lunch breaks at work.
3. Do the detail painting on the ESU spaceships.


I like how your cammo has worked out - good idea with the mesh. this has made me think of finding the airbrush and compressor and reacquaint myself with them both (it's been a few years now).
ReplyDeleteI think the campo and use of mesh is awesome - really makes them look SciFi vice just another camp scheme
ReplyDeleteThe practise with the camo paid off, the vehicles look greta, but I'm really looking forward to how the power armour guys turn out.
ReplyDeleteLooking good, the more you use your airbrush the easier it gets!
ReplyDeleteThe camouflage looks great. Brilliant job!
ReplyDeleteI've yet to use an airbrush, so haven't a clue how it differs from normal brush painting. But I reckon I might end up getting one should I need to paint up a large amount of armoured vehicles.
ReplyDeleteBest of luck with the practicing.
I am really getting tempted seeing all this airbrushing of yours Tamsin. Never tried it before but you seem to get some amazing results from yours :-)
ReplyDelete@ Dan - cheers! It has worked out well overall, although the mesh wasn't as effective as it should have been - definitely a case of needing more practice :)
ReplyDelete@ Paul - "another camp scheme"? Dahlink, that would have been pink glittery ;)
@ Joe - cheers! The PA guys should be finished (apart from basing) tonight. They'll be joining the 42 I've already painted, so you can take a look back to see how they came out.
@ Dave - yup - practice, practice, practice ;)
@ Simon Q - thanks! :)
@ Roy - airbrushing is good for large areas (less wasteful than spray cans) but can also be good for fine details if you have the right type and a lot of practice. I'll mostly be using it for priming, base coats and possibly varnishing. Hmm, wonder if my Klear/ink mix will work with it?
@ Blax - I think vehicles and such like will probably be where it gets used the most. That and priming/varnishing. If I had the time to practice, I'd considered a fine needle type for doing detail work. :)