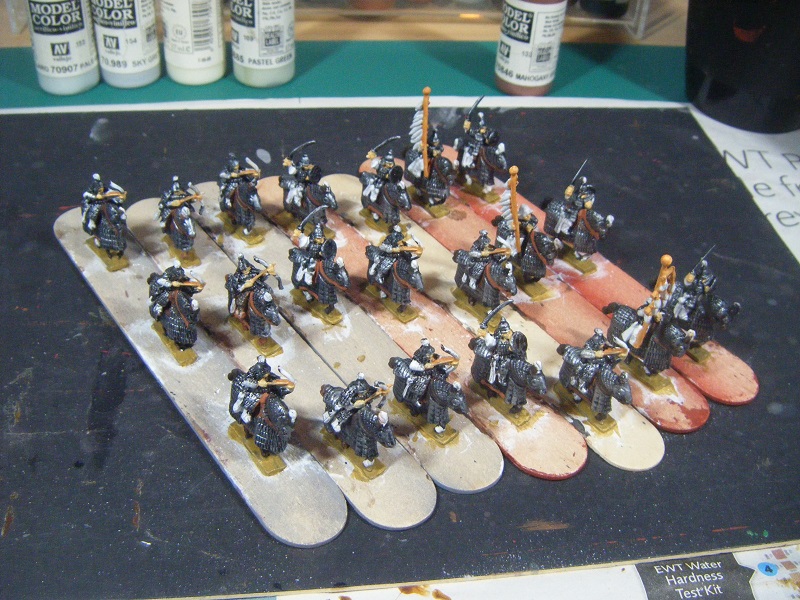
I had a bit of a lie-in this morning, then after having some juice I did a little bit of hobby work before chores. Last night I'd superglued some Korean crossbowmen onto bases. They'd been prepped about a year ago, but I didn't get round to them (shame on me!). In the past, for my Koreans, I've added basing texture by supergluing ballast onto the bases around the figures. I decided to try something different this time to (hopefully) achieve the same effect - using coarse pumice gel.
It took much longer to apply so I'll wait to see how it compares on the painting front before deciding whether or not to do the same with the rest of the Koreans I've just received. I'll probably paint these up after the Mongol heavy cavalry just to get them out of the way.
After that little job, I added sand to the scatter terrain pieces. A lot of the grit I'd added yesterday came loose - I should probably have stuck that down with PVA to be safe - lesson learnt. A few hours later I spritzed the pieces with 25% PVA to seal the grit and sand in place.
I'll give them a coat of brown craft paint this evening.
As for the Mongols, I've made decent progress this afternoon. All the clothing, boots, quivers, bowcases and sword scabbards are done, as are the shields (apart from the metal parts) for those that have them. That just leaves the bows, horsetail plumes, taches and metal details to do before giving them a Klear/ink coat.
I should (if all goes to plan) finish painting them tomorrow. On Tuesday I'll glue them onto bases, add basing texture and paint that before spraying them with matt varnish and adding some static grass.
About Me
- TamsinP
- London, United Kingdom, United Kingdom
- A mythical beast - a female wargamer! I got back into wargaming in the summer of 2011 after a very, very long break and haven't looked back since. I must admit that I seem to be more of a painter/collector than a gamer, but do hope to correct that at some point in the near future. My gaming interests span the ages, from the "Biblical" era all the way through to the far future. I enjoy games of all sizes, from a handful of figures up to major battles (see my megalomaniacally sized Choson Korean and Russian Seven Years War armies).
Sunday, 13 November 2016
Saturday, 12 November 2016
Shinies and Scatter Terrain
This morning I collected the two packages I'd been left red cards of joy and frustration for. I knew what one of them was because the box had a label on it; the other I could tell what it was from the weight and shape. This is what they were:
Yay! The replacement airbrush I ordered last weekend. And a box from Timecast...
The package from Timecast wasn't my full order - I'm still waiting for a pack of SYW casualties, two packs of Nubian archers and nine packs of Sea Peoples. I'm hoping they'll arrive in time to get them prepped for the Challenge.
Not long after I'd unpacked these and taken pics, the postie (not Evil Postie before you ask) turned up with the third package I was expecting - a fairly big restock of bases from Tiny Tin Troops. I'm now trying desperately to remember what I ordered a bunch of 25x50mm bases for.
This afternoon, whilst chatting on Google Hangout with Dave D and Martin C (and Edwin K briefly), I did a bit of prep work for a mini project - some scatter terrain for my Crusties. First job was to cut some scatter bases from 3mm EPVC. I found that the easiest way to cut curves for irregular shapes was to do it on a bevel, which had the bonus advantage of combining the two steps. Once they were all cut, I roughly sanded them ready for the main job.
After tidying up a bit I added blobs of Das putty onto the bases, smoothed it down onto the edges then added various bits of scrap plastic (corrugated plasticard, pipes, angle beams etc) and some small pieces of wire mesh. After that I pressed some grit into the putty. This is how they look at the moment:
I'm leaving them overnight for the Das to harden, then tomorrow I'll add some sand then give them an undercoat of craft paint and PVA. During the week, I'll paint them up.
In case you're wondering, these will be scrap heaps to add some LOS-blocking cover for games of Gruntz.
Of course, all of this means that I haven't done any work on the Mongols today, but I will crack on with them tomorrow.
Toodle-pip!
Yay! The replacement airbrush I ordered last weekend. And a box from Timecast...
| Lots of packets of Old Glory 15s |
| Korean regular troops |
| Korean irregular troops |
| Nubians |
| Sea Peoples |
Not long after I'd unpacked these and taken pics, the postie (not Evil Postie before you ask) turned up with the third package I was expecting - a fairly big restock of bases from Tiny Tin Troops. I'm now trying desperately to remember what I ordered a bunch of 25x50mm bases for.
This afternoon, whilst chatting on Google Hangout with Dave D and Martin C (and Edwin K briefly), I did a bit of prep work for a mini project - some scatter terrain for my Crusties. First job was to cut some scatter bases from 3mm EPVC. I found that the easiest way to cut curves for irregular shapes was to do it on a bevel, which had the bonus advantage of combining the two steps. Once they were all cut, I roughly sanded them ready for the main job.
After tidying up a bit I added blobs of Das putty onto the bases, smoothed it down onto the edges then added various bits of scrap plastic (corrugated plasticard, pipes, angle beams etc) and some small pieces of wire mesh. After that I pressed some grit into the putty. This is how they look at the moment:
I'm leaving them overnight for the Das to harden, then tomorrow I'll add some sand then give them an undercoat of craft paint and PVA. During the week, I'll paint them up.
In case you're wondering, these will be scrap heaps to add some LOS-blocking cover for games of Gruntz.
Of course, all of this means that I haven't done any work on the Mongols today, but I will crack on with them tomorrow.
Toodle-pip!
Labels:
15mm,
Koreans,
Nubians,
Old Glory 15s,
On the workbench,
Sea Peoples,
shinies,
Terrain,
WIP
Friday, 11 November 2016
Mongol Heavy Cavalry WIP 2
Over the past two evenings I've managed to do a little bit of work on the Mongol heavy cavalry. The horse flesh is done, I've painted the horse tack and the ground colour on the bases, as well as starting on the riders - just the flesh and arrow shafts so far.
I'll be carrying on with them over the weekend and might even finish painting them. Then it's the Klear/ink coat, stick them on bases, add basing texture, paint that and do some flocking.
This bunch will give me four bases of heavy cavalry and three command bases (one stand-alone and two "included" - ADLG allows you to have a commander incorporated in a troop base, which can be a risky prospect).
I've also placed an order for the extra figures I'll need for the medium cavalry. And some more heavy cavalry (with lances), some dismounted bowmen and some figures for the baggage camp.
Tomorrow morning I'll be making a trip to the local Royal Mail depot to pick up the packages associated with two red cards of joy and frustration that the postie has left over the last two days. I'm expecting three packages at the moment, so I'm not sure which two these will be.
Tuesday, 8 November 2016
Mongols Limbering Up
As I can't do any priming at the moment, I decided to do a bit of painting to get my hand back in. Looking around at what was ready (and not lined up for the Challenge) I picked out a load of Mongol cavalry which I prepped and primed over a year ago. After a quick check of the Mongol Empire list for ADLG I realised that I've got enough heavy cavalry figures but I'm somewhat lacking on the medium cavalry front - I'll be placing an order for enough figures to make up 5 more bases and some baggage camels for the camp.
With that decided, I chose to crack on with the heavy cavalry and some command groups. I had primed them white and then applied a black basecoat to the metal areas - helmets, lamellar armour, helmets and horse barding. This evening I drybrushed all the metal with Natural Steel. Tomorrow I'll be doing the horseflesh, or what little of it is visible.
I also decided it was time to face up to a task I'd been putting off for a few weeks - gluing the wheels onto the limbers for my 6mm ACW infantry. I managed to restrain myself from actually swearing out loud (I was chatting in Google hangout with Dave D and Martin Cooke) I got them all glued in place, even if some are slightly skewed. I'm hoping that Mr Berry will have redone them so that they are one piece castings like he did with the guns before I order any more.
That's all for today folks!
Monday, 7 November 2016
SYW Russian Infantry Primed
Well, this evening I managed to get the other half of the Russian infantry primed. Even with the primer heavily thinned and with flow improver added it was hard going trying to use it with my 0.35mm airbrush. I'll wait until my new 0.5mm airbursh arrives before doing any more priming.
So, here they are in all their red glory (gory?):
The strip at the front is artillery crewmen for 2 guns.
That will be eight regiments to add to my collection once they're painted. I'm actually very tempted to add figures for the remaining 13 infantry regiments which fought in the SYW to the order I'll be placing with Essex for wagons and limbers.
Last night I added some basing gunk to some of the Salutesville figures which don't need Milliput:
To close off this post, a quick heads-up for any UK readers who use hot glue guns a lot - Lidl have a good deal on glue sticks at the moment: £2.99 for a pack of eighteen sticks (Parkside PHPZ 3 A1; 11 x 280mm) so it's probably a good time to stock up for future needs if you're quick!
Sunday, 6 November 2016
Sunday Update
I actually got a reasonable amount done today. I did the camo scheme tests on the choppers and also added Milliput to the bases of some of the Salutesville figures.
Camo Scheme Tests
I decided to take a few pics at each stage, just to show you.
I used a mix of clean and previously-used stencils
After the mid-tone I used a mix of the medium and mini stencils.
I think both colour schemes work well. However, When I do them for real I think I'll use the mini-hexes over the base colour (and a lot more of them) and a mix of mini and medium hexes over the mid-tone (and a few more of those).
As I noted earlier, I also added Milliput to the bases of some of my Salutesville figures:
Fifteen down, another 55-60 to go! Once the Milliput has cured on these, I'll be carving it. I'll be doing the figures in batches every evening this week.
I've also done some priming this evening. I've made up a mix of the red primer with thinner and flow improver in a dropper bottle. I've got one batch of SYW Russian infantry done and will be doing the next batch shortly. That will be half of them - the rest will get done tomorrow evening if all goes well.
Camo Scheme Tests
I decided to take a few pics at each stage, just to show you.
| Basecoat with first stencils added |
| Close up on the stencils |
| After mid-tone |
| More stencils added |
| After the light tone but before removing stencils |
| Stencils removed |
| Close-up to show the different size hexes |
| Another close-up |
I think both colour schemes work well. However, When I do them for real I think I'll use the mini-hexes over the base colour (and a lot more of them) and a mix of mini and medium hexes over the mid-tone (and a few more of those).
As I noted earlier, I also added Milliput to the bases of some of my Salutesville figures:
Fifteen down, another 55-60 to go! Once the Milliput has cured on these, I'll be carving it. I'll be doing the figures in batches every evening this week.
I've also done some priming this evening. I've made up a mix of the red primer with thinner and flow improver in a dropper bottle. I've got one batch of SYW Russian infantry done and will be doing the next batch shortly. That will be half of them - the rest will get done tomorrow evening if all goes well.
Saturday, 5 November 2016
Saturday Workbench
I got rather distracted this week, mostly watching videos on YouTube, so I didn't get as much done in the evenings as I'd hoped. The only thing I did manage to do until today was to add basing texture (a mix of fine, coarse and extra coarse pumice gel) to the sheep and the Soviet women.
I had high hopes for getting lots done today, but things didn't pan out quite as well as I'd hoped. My intention had been to get the airbrush out and prime as many figures as possible. It started out OK, but then I hit a major snag. I'd noticed that when cleaning between colours/fills there were a lot of bubbles coming out of the nozzle cap threads which is an indication that the nozzle is either too loose or too tight. So, I removed the needle and went to unscrew the nozzle...
...and it snapped with most of the thread still in the body of the airbrush. And too deep to get it out with the tools I have. Not that getting it out would help much as I don't have a spare and they seem to be out of stock everywhere. B****r! As I'm going to need a 0.5mm airbrush and I don't see any way of getting the broken nozzle thread out, I've had to order a new one. It should be delivered next weekend.
In the meantime I'll have to use my other airbrush which has a 0.35mm needle which means I'll need to add thinners and probably flow improver to the primer, not to mention cleaning even more regularly to prevent blockages.
One thing I did do in this session was to test out my Vallejo red primers to see if I could use them instead of spray-cans for priming the SYW Russian infantry.
The Pure Red seems to be pretty close so I'll go with that. I lightly re-primed the ones I'd done in German Red Brown (they're slightly darker in the pic above).
Anyway, here's what I did get primed:
The Soviet women also got primed, as did two more choppers I bought this morning (£1.50 each from Wilko). Having learnt from last week how annoying the rotor was when airbrushing, I removed them today for painting these two. I'll be trying out some alternative camo schemes tomorrow using the mini-hexocam stencils.
Apart from the new airbrush, I've ordered a few more things this week. Last night I ordered a few more stencils and some paints/primers from SnM Stuff. I also did a restock of bases from Tiny Tin Troops ready for the Challenge - nothing worse than running out and having to wait for more to arrive.
This evening I've placed an order with Timecast for some Old Glory 15s - the additional Koreans I need to complete that army, some SYW casualties and two ancients armies for ADLG. I foresee a lot of figure prep at work in the weeks after they arrive!
I've got a couple more orders still to place - the limbers and wagons from Essex and some more ACW infantry from Baccus when I finally work out how many more regiments I want/need.
Plans for this week:
1. Do the basing on the Salutesville figures. Lots of messy Milliput action!
2. Camo scheme test on the choppers.
3. Start painting the Mongol cavalry I started a long, long time ago.
I had high hopes for getting lots done today, but things didn't pan out quite as well as I'd hoped. My intention had been to get the airbrush out and prime as many figures as possible. It started out OK, but then I hit a major snag. I'd noticed that when cleaning between colours/fills there were a lot of bubbles coming out of the nozzle cap threads which is an indication that the nozzle is either too loose or too tight. So, I removed the needle and went to unscrew the nozzle...
...and it snapped with most of the thread still in the body of the airbrush. And too deep to get it out with the tools I have. Not that getting it out would help much as I don't have a spare and they seem to be out of stock everywhere. B****r! As I'm going to need a 0.5mm airbrush and I don't see any way of getting the broken nozzle thread out, I've had to order a new one. It should be delivered next weekend.
In the meantime I'll have to use my other airbrush which has a 0.35mm needle which means I'll need to add thinners and probably flow improver to the primer, not to mention cleaning even more regularly to prevent blockages.
One thing I did do in this session was to test out my Vallejo red primers to see if I could use them instead of spray-cans for priming the SYW Russian infantry.
The Pure Red seems to be pretty close so I'll go with that. I lightly re-primed the ones I'd done in German Red Brown (they're slightly darker in the pic above).
Anyway, here's what I did get primed:
The Soviet women also got primed, as did two more choppers I bought this morning (£1.50 each from Wilko). Having learnt from last week how annoying the rotor was when airbrushing, I removed them today for painting these two. I'll be trying out some alternative camo schemes tomorrow using the mini-hexocam stencils.
Apart from the new airbrush, I've ordered a few more things this week. Last night I ordered a few more stencils and some paints/primers from SnM Stuff. I also did a restock of bases from Tiny Tin Troops ready for the Challenge - nothing worse than running out and having to wait for more to arrive.
This evening I've placed an order with Timecast for some Old Glory 15s - the additional Koreans I need to complete that army, some SYW casualties and two ancients armies for ADLG. I foresee a lot of figure prep at work in the weeks after they arrive!
I've got a couple more orders still to place - the limbers and wagons from Essex and some more ACW infantry from Baccus when I finally work out how many more regiments I want/need.
Plans for this week:
1. Do the basing on the Salutesville figures. Lots of messy Milliput action!
2. Camo scheme test on the choppers.
3. Start painting the Mongol cavalry I started a long, long time ago.
Subscribe to:
Posts (Atom)